
Introduction
If you run multiple servers and you do not want to edit files and open folders using ssh client and text editors like vim, vi or nano and you want to take advantage of all the features of Visual Studio Code then this tutorial is just for you.
There are several extensions that will help you to achieve this. I personally use the Remote Development extension.
I find it really easy to use and it was also quite simple to configure it as well. However, you are free to use other extensions as well. A few examples are the Remote SSH , SSH FS , Remote X11
Prerequisites and System requirements
On your Local machine you need to have a supported OpenSSH compatible SSH client
On the Remote server you need to have an SSH server
- x86_64 Debian 8+, Ubuntu 16.04+, CentOS / RHEL 7+.
- ARMv7l (AArch32) Raspbian Stretch/9+ (32-bit).
- ARMv8l (AArch64) Ubuntu 18.04+ (64-bit).
- Windows 10 / Server 2016/2019 (1803+) using the official OpenSSH server.
- macOS 10.14+ (Mojave) SSH hosts with Remote Login enabled.
Installation
If you already have an openssh-client and Visual Studio installed you can go ahead and install the Remote Development extension package.
Connect to a remote host
I will recommend you using ssh-keys in order to use secure authentication and to make your general experience a lot better.
If you haven't created any ssh-keys yet you can check this tutorial
First, you can verify that you can access the server using an ssh-client and also make sure that your ssh-keys are copied to the remote server as well. Once you can confirm that the connection from the ssh-client is working you can go ahead and open Visual Studio Code.
- In Visual Studio Code open the Palette using F1 (for macOS Ctrl+Shift+P or Command+Shift+P) and select Remote-SSH: Connect to Host...

-
Select Add New SSH Host...
-
Enter the details:
sshIf you're going to use ssh-keys please use the following:ssh -i ~/.ssh/id_rsa-remote-ssh user@remote-server This will generate the SSH Config on your behalf and you'll be ready to go.
**Note: You need to replace the $USER with your actual username for the server and the remote-server with the server's hostname or the IP address.
- You can open the SSH configuration file and make sure that the ssh-key is specified and also if you're using a custom SSH port you need to specify it as well.
To open the configuration file open the palette and select Remote-SSH Open Configuration File...

Then select the SSH config file - path_to_user/.ssh/config
The file will look like this:
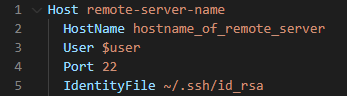
Note: You need to replace the user, hostname, path to the identity file and specify any custom SSH port, if you're using the default SSH port 22 you do not need to specify the port in the SSH configuration file.
- Visual Studio will try to connect and if everything is okay you will be connected to the remote server.
If you're experiencing issues you will see the log for the SSH authentication in the Output console at the bottom of your Visual Studio Code, you can examine the log and locate any problems. The most common will be the pubkey authentication failure - Permission denied (publickey)
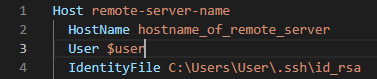
If this is the error you can see in the log then open the SSH configuration file
and make sure that the details you see are correct. The path to the Identity file for users using Windows will be:
C:\Users\User\.ssh\id_rsa1
Conclusion
This is pretty much how you can connect to a remote server via Visual Studio. I find it really handy because in this way you can take advantage of all VS features and installed extensions for coding faster, better and etc. I hope you find this post helpful and please comment if you use other plugin or use a different method to code on a remote server.
Used sources
You can also check the process on Visual Studio's website and also explore some additional features.